For a collection of large amounts of data, for example measurement data by means of sensors, large amounts of data accumulate in a short time, which must be recorded with a time stamp of the respective measurement time (time series data). The InfluxDB database was developed specifically for these tasks. With the InfluxDB Plug-in, the OPC Router is able to transfer this data directly to an Influx database and thus make the data volumes available for analysis and BigData applications. If you use InfluxDB Cloud or InfluxDB 3, you can find out more about the practical connection in our guide “Connecting data sources with InfluxDB Cloud and InfluxDB 3”.
You can find a dedicated video about the topic “connection of database systems” by visiting our tutorial stream.

Contents
- Create InfluxDB 2 token
- Provide required authentication data
- OPC Router 4 Settings for InfluxDB 2
- Display data in InfluxDB 2
Here you will find more basic information about the REST Plug-in and the Network File Access Plug-in as well as the Telegram Bot.
Learn in our instructions how to connect the data sources of your production with the help of the OPC Router InfluxDB Plug-in in the graphical configuration and how to transfer data. Below we have presented a step-by-step guide for a successful connection in a compact and clear way.
1. Create InfluxDB 2 token
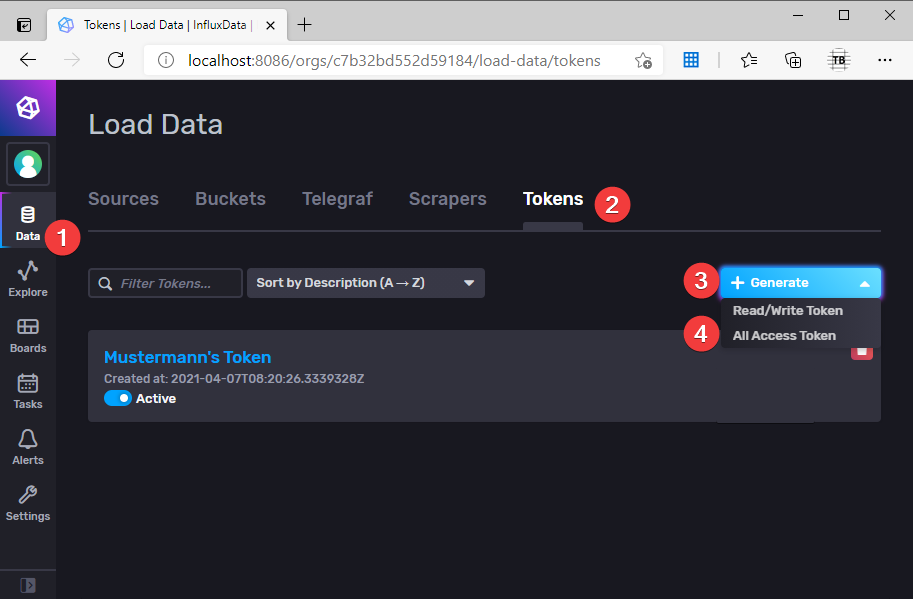
1. Create a token for the necessary rights in Influx. To do this, go to the Influx interface and then via the following menu items: Data (1) –> Tokens (2) –> Generate (3) –> All Access Token (4)
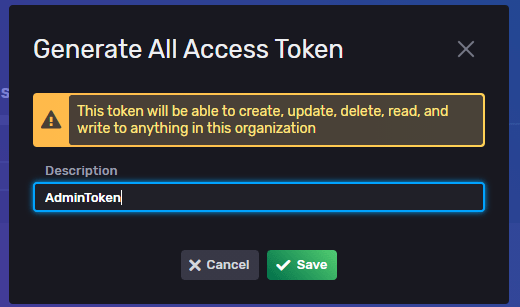
2. A pop-up opens where the token can be named.
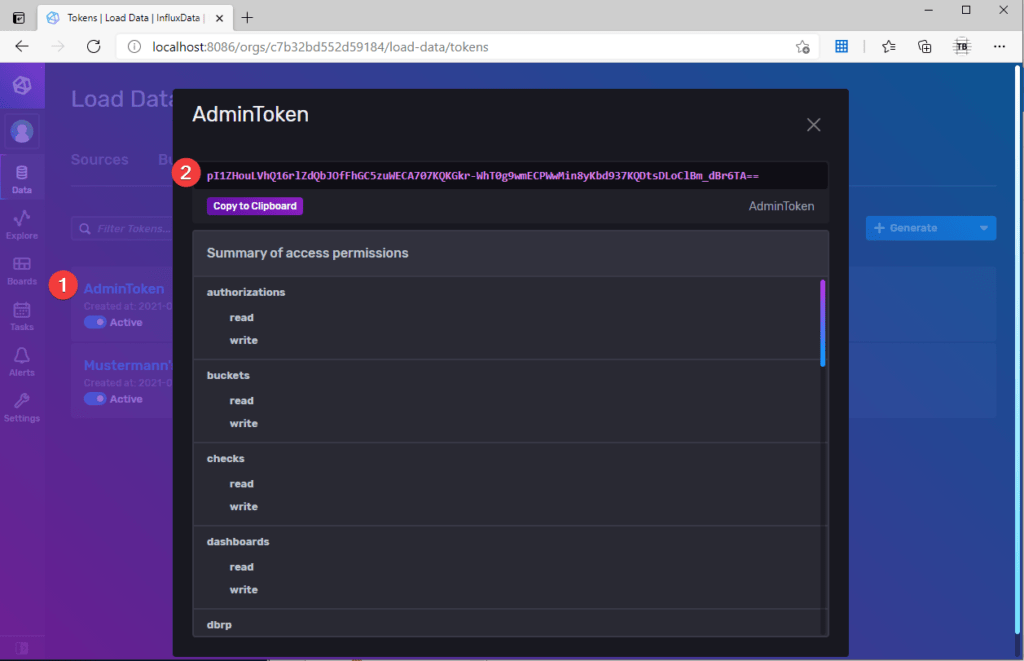
3. Then click on the token (1) and make a note of the ID (2).
2. Provide required authentication data
To do this, a user for the v1 API must be created on InfluxDB 2. To do this, carry out the following steps.
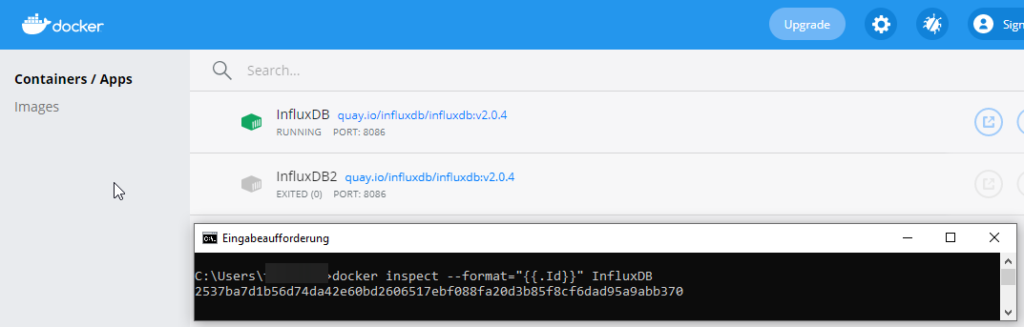
1. Determine the Docker Container ID: To do this, open the CMD and enter the following:
docker inspect --format="" InfluxDB
2. Establish a Docker container connection with the root user so that the necessary rights are available.
To do this, enter the following in the CMD (you will need the container ID you have just determined):
docker exec -it --user root 2537ba7d1b56d74da42e60bd2606517ebf088fa20d3b85f8cf6dad95a9abb370 /bin/bash- now the following can be seen in the CMD:

3. Create InfluxDB connection configuration:
influx config create
--config-name
--host-url <(http://localhost:8086)>
--org
--token
Now execute the following with the user root in CMD
influx config create --config-name admin --host-url http://localhost:8086 --org influxdata --token pI1ZHouLVhQ16rlZdQbJOfFhGC5zuWECA707KQKGkr-WhT0g9wmECPWwMin8yKbd937KQDtsDLoClBm_dBr6TA== --active
Then it should look something like this:

4. Determine Influx Bucket ID
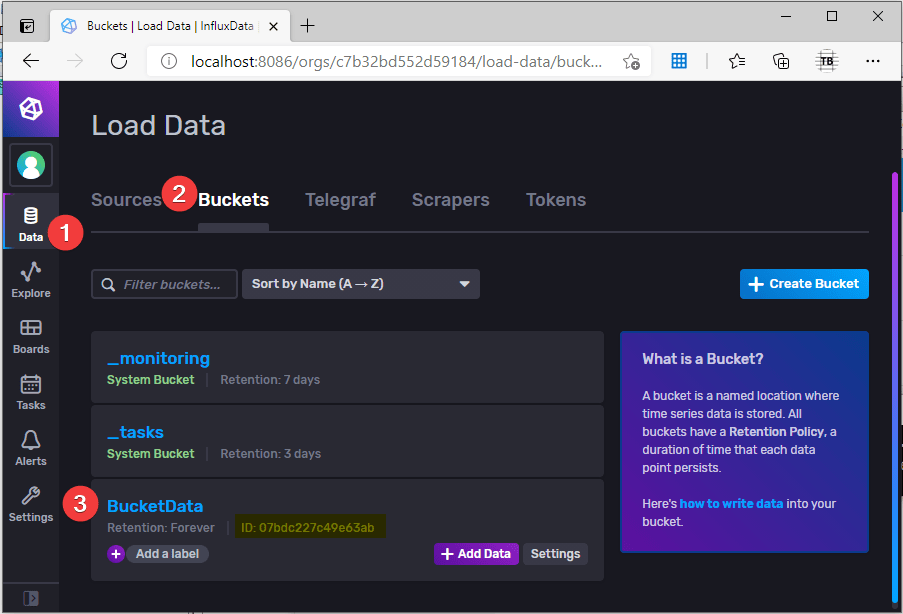
To do this, go to the Influx interface: Data (1) –> Buckets (2) –> look at the desired bucket (3) and note the ID.
5. Create a legacy authorisation using the InfluxDB 1.x compatibility API. It is important to be case sensitive when doing this:
influx v1 auth create
--read-bucket
--write-bucket
--username
--org
Now execute the following with the user root in CMD:
influx v1 auth create --read-bucket 07bdc227c49e63ab --write-bucket 07bdc227c49e63ab --username Mustermann --org InfluxData
If you get an error message here, you can also use the following:
influx v1 auth create --read-bucket 07bdc227c49e63ab --write-bucket 07bdc227c49e63ab --username Mustermann --org InfluxData --password *****
Then assign a password. The password is not actively displayed as written if it is entered in the blue-marked position.

6. Determine Influx Org ID
Now execute the following with the user root in CMD: influx org list.

7. Manually creating a DBRP mapping
A database and retention policy mapping follows so that the data can be queried:
influx v1 dbrp create
--db
--rp
--bucket-id
--org-id
Now execute the following with the user root in CMD:
influx v1 dbrp create --db BucketData --rp Forever --bucket-id 07bdc227c49e63ab --default --org-id c7b32bd552d59184
Then it should look something like this:

3. OPC Router 4 Settings for InfluxDB 2
The next steps are to set up the Plug-in and the connection.
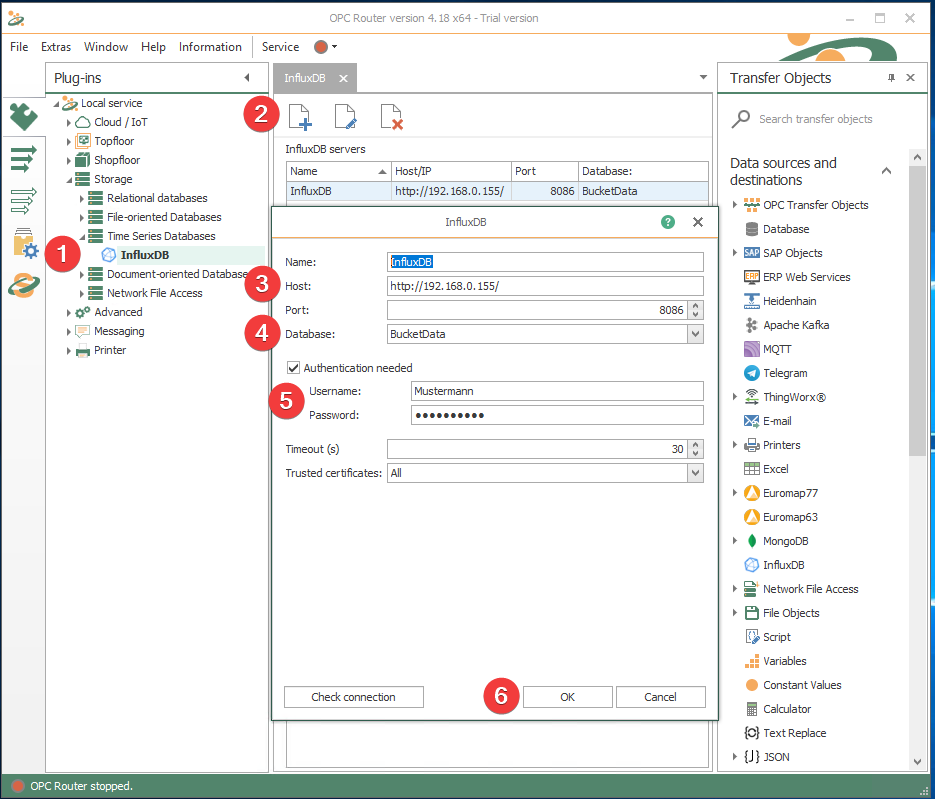
1. Create the InfluxDB Plug-in in the OPC Router:
- Navigate to the InfluxDB Plug-in.
- Create a new InfluxDB server.
- Adjust the name and the host.
- Specify the bucket for Database.
- Use the user and password from the item “Create a legacy authorisation with the InfluxDB 1.x compatibility API”.
- Test the connection and confirm with OK.
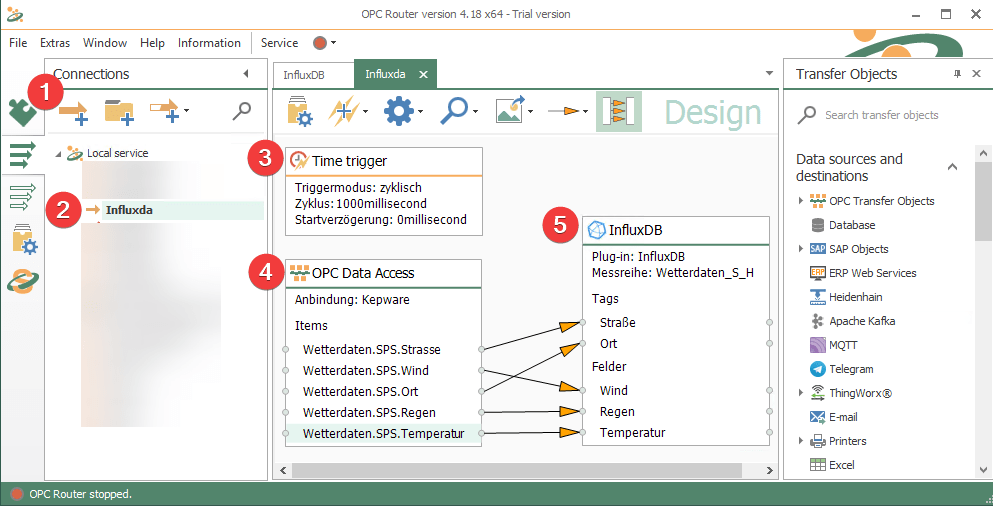
2. Create an InfluxDB connection in the OPC Router
Here a connection is created in the OPC Router to transfer data.
- To do this, create a new connection.
- Open it.
- Use a trigger object, here a time trigger.
- Select the source from which the data is to be obtained. In this case it is the KEPServerEX 6.
- Select the transfer object InfluxDB to define where the data should be written.
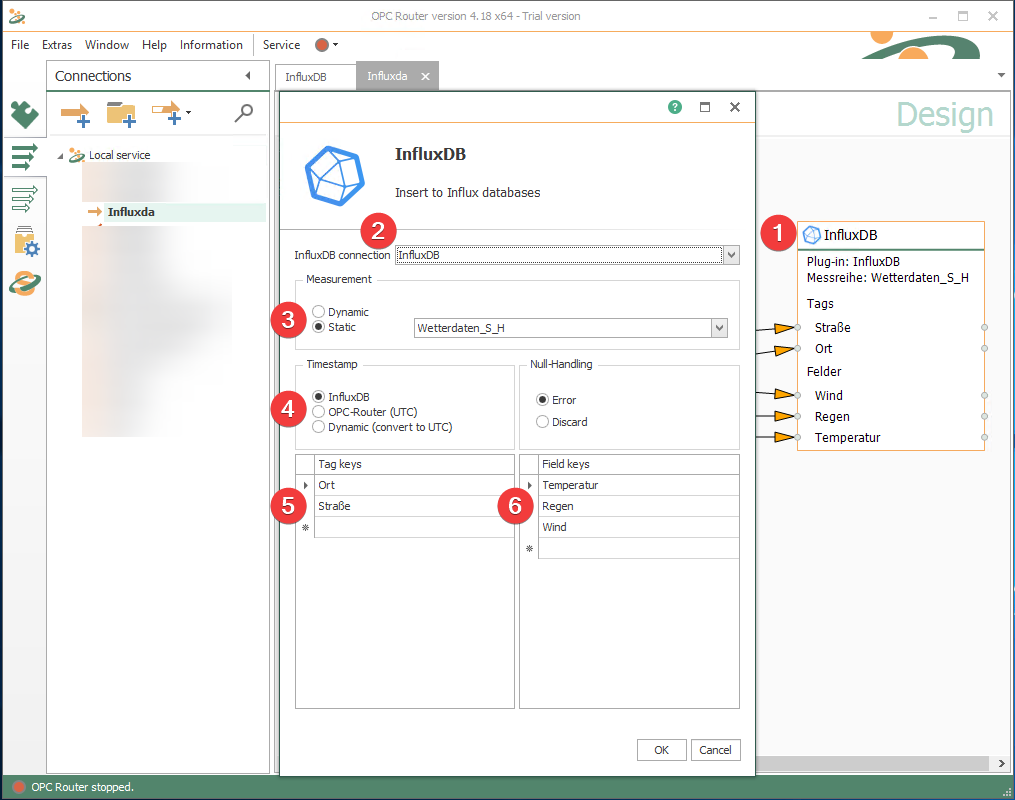
3. Transfer object InfluxDB
- Double-click to open a transfer object.
- Select the Influx connection you created previously.
- Enter a measurement series, whereby the name can be chosen arbitrarily. If there is no measurement series yet, it will be created automatically in Influx.
- Select a timestamp with which to save the data.
- Enter the tag keys that are to be assigned to the written value (serves as a filter in Influx, among other things).
- Specify the Field Keys, i.e. the fields into which the value is to be written.
- Confirm with OK.
Make the newly created connections productive in the OPC Router.
4. Display data in InfluxDB 2
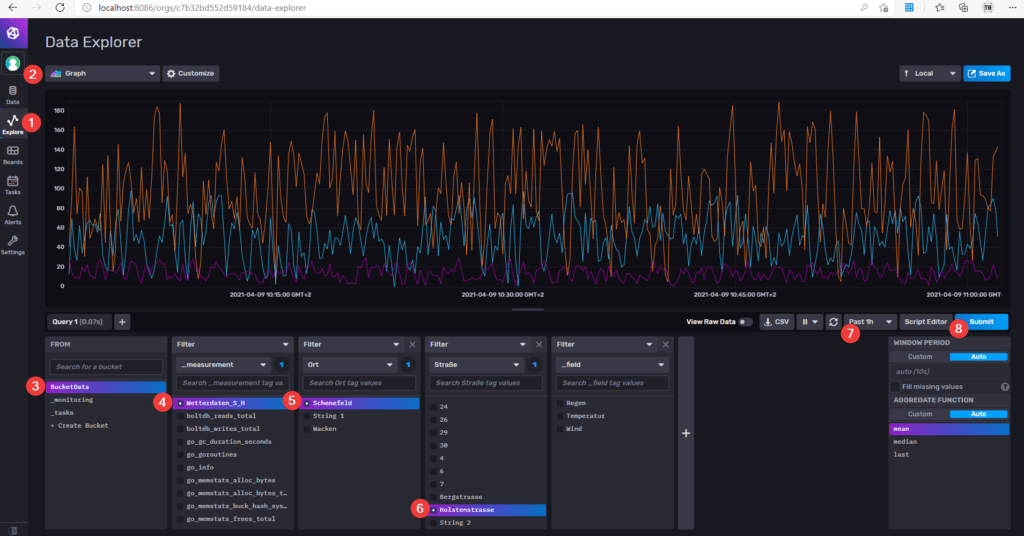
1. Go to the InfluxDB 2 interface, select Explore from (1) and e.g. the graph (2). Under (3) you can select the bucket and at (4/5/6) you can select filters to not show all data, but only certain ones. Under (7) you can select which time period is to be viewed. Under (8) you can see a display with the settings made.
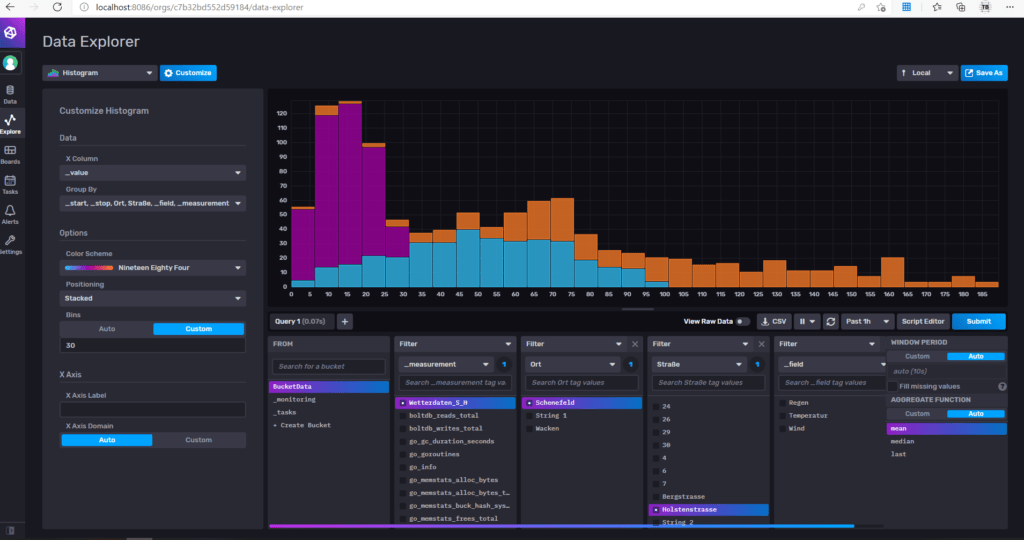
2. With influxDB 2, different display options can be selected and adapted with “Customize”:
Weitere Informationen
With its REST Plug-in, the OPC Router is able to address and query REST web services. Almost every system can be connected with REST API and it is possible to request data from these systems or to transfer data. REST functions can be made available for invocation via the REST trigger. This makes it possible to build your own REST API for any system that is connected with the available Plug-ins.
A Telegram Bot is a good option to publish information from almost every conceivable area whenever you need it. We refer to this special functionality in our Knowledge Base “Technology” post and also provide instructions on how to create a Telegram Bot yourself.

With the OPC Router Network File Access Plug-in, file handling and network-wide file transfer can be realised. The Plug-in supports FTP (File Transfer Protocol) and the SMB (Server Message Block) protocol. Via FTP, files can be exchanged between file servers in any network if a corresponding FTP server service is provided.
Further interesting articles on the topics of Industry 4.0, cloud, technology, alerting and practical application examples as well as case studies can be found in our Knowledge Base.
Run a free test now!
Get your personal link to the most recent OPC Router version and sign up for product news.